Monday, September 24, 2012

敷居の高いフレーム加工 - Mechanic Service at Bike Shops


BH Cristalの組立をそろそろ始めようかなと考えたとき、要のプレスフィットBBについては工具を買い込んで作業するというのも経験だが、出来ればプロに任せたいという気持ちもあって、ネットでショップをいくつか調べて見た。自転車業というのは今も順風満帆ではないし、総じて閉鎖的とも聞いているので、予想としてはそのショップで自転車を買ってくれたわけでもない客の持ち込み作業などに積極的なショップは少ないだろうと思っていた。
まずBH正規取扱店というのがいくつかあって、その中に僕がいつも走っているサザンビーチにY’s Road茅ヶ崎店があったので、練習ついでに立ち寄って相談してみることにした。しかし店員からはいともあっさり断られてしまった。その言い分としては「保障上の問題に対処できないので」とか説明していたけど、高額完成車を売って儲けている店では手間がかかって実入りにならない技術サービス単独の顧客には興味ないということだろうと解釈した。土台、文句が言える話じゃないけど。

もっとメカニックの技量で勝負するようなショップがあっても良いのにと思いながら、技術工賃を公表しているショップを探してみたら、ネットで2軒見つかった。東日本橋のaveloと青葉台の轍屋だ。両店で扱う自転車の傾向を見て、神奈川県内の轍屋を訪ねることにした。作業中の店主に声をかけて相談したら、ここでは大抵のことは対応してもらえそうなので、BBもスギノのセラミック・コンバーターを取り寄せてもらい、それを圧入してもらうことにした。ヘッドパーツもクラウンレースと下玉の圧入があるので、コラムカットまでお願いした。安心してお任せできる感じが良い。

I originally considered installing pressfit bottom brackets and head parts in BH Cristal frame for myself, but on the other hand honestly hoped to see them fitted by a professional. This was partly because bike shops in Japan often do not accept such framework services.
Through searching in the net, I came across with Wadachiya in Aobadai, Kanagawa with excellent experience as a mechanic for pro racers, and they seemed flexible and cooperative with the customers, so I decided to place an order for Sugino ceramic bottom bracket to be inserted and also cutting the fork column after head set insertion.

By the way, US friend of mine quickly collected Dura Ace components and completed G5: He is now in such an ecstacy that he drove himself to Specialized BG Fit for finer fitting adjustments. I thought Specialized activities in this area was purely for pro racers and was not aware of their business toward consumers. Looking into the local situation, I found Specialized Tokyo did accept reservation of only one customer per day, and the fee for a roadracer was 21000 Yen. And now back to the topic of Wadachiya, they put a banner of BG Fit in their website and they do the service themselves! 
I would assume 2 to 3 grand bills not too pricy considering the face-to-face service for 3+ hours by a trained staff, but I also hope one day this becomes more common among broad bike riders like a health check, then the comfortable cost seems to be somewhat in a lower range.


話は飛ぶが、米国の友人はDura Aceのパーツを集めて早々にG5を組み上げてしまったようで、今まさに有頂天状態だ。その勢いでSpecializedBG Fitに行ってフィッティング調整まで受けたという。僕はSpecializedの活動はプロレーサー対象くらいに思っていたので、そんな一般向けサービスがあるということは知らなかった。国内の事情を調べて見たら東京のSpecializedでは11名の予約を受けているようだ。予算はロードレーサーなら21,000円。そこで轍屋に戻るのだが、そのサイトにもBG Fitのバナーが貼られていることに気付く。ここには調整にBGフィットベッドというインソールを必然的に使うので、その代金6300円もほぼ加算されることになる等書かれている。専任スタッフがかかりきりで3時間くらいかけて対応するわけだから、今の料金が高いとは言えないし、靴や背広を誂えることを考えても大枚2枚くらい飛んでも仕方がないように思う。他方、これはクリニックとして将来誰もが積極的に活用するような時代になると良いなと僕は思うので、そんな目線で言えば料金の程良い値頃感というのはもう少し下のような気がする。でも一度は健康診断みたいに受けておきたいな。

その轍屋から電話連絡があって、フレームの組み立てが完了したとのことだ。早速引き取りに出向いた。今回こだわってみたスギノのプレスフィットBBも美しく収まって、カラーマッチングもピッタリだ。急いではいないけど、小物パーツを少し買い込めば、組み立て開始でちょっとワクワク気分だ。


I received a phone from Wadachiya reporting the work was done, and I went to pick up my frame on Sunday. Sugino ceramic PF bracket was in place beautifully with the perfect color matching. I need to get some small parts, and then I can start building the new bike!

Thursday, September 20, 2012

センサーの導入 - Sensor Installation

ガーミンGSC-10スピード/ケイデンスセンサーとWahooがアマゾンから届いたので、早速自転車に取り付けた。セッティングは特に苦労もなく、すんなり機能し始めてくれた。これはiPhoneのCyclemeterアプリのステップアップ目的だ。

今日は我が定番コースのひとつ、サザンビーチまで走って、センサーとGPSでの距離計測の誤差確認をしてみた。通常GPSで17.2kmくらいになる距離が、今日はセンサーで18.02kmを示している。5%ほど長い。アプリの設定でタイアの径を標準の700mmでインプットしてあるが、これを微修正するべきか?GPSのほうが正確だと想定しての話だけど。

ケイデンスは大切なファクターでそのデータを眺めるのは面白い。今日のコースは気持ち良く走れることもあってか、70を超えた高い回転率で維持できているのは、我ながら秀逸か!


iPhoneケースはステムのボルトに固定できるIberaを選んでみたのだが、位置が近過ぎて走行中に見るのは難しかった。


Garmin GSC-10 speed/cadence sensor and Wahoo ANT+ device arrived from Amazon, and I immediately installed them on my bike. Everything was done straightforward and they started functioning. This was a step-up for Cyclemeter in iPhone.

I ran today to Southern Beach, one of my favorite routes, to see the discrepancy of distance measurement by the sensor against that by GPS. GPS used to indicate approximately 17.2km, but today the sensor indicated 18.02km, therefore it is 5% longer. The tire diameter I entered is nominal 700mm, and I should probably adjust it assuming GPS is more accurate.

Cadence data is important and its review is interesting. I love this route and because it is always a great fun running here, today’s cadence data appeared to me excellent maintaining well over 70rpm.


I also bought Ibera iPhone case to be attached to the stem bolt, but the position was too close to watch while running.

Friday, September 14, 2012

西穂高岳 - Mt. Nishi-Hodaka


夏のハイシーズンが終わったら穂高に登ろうと計画していたが、今年はいつまで経っても暑さが続き、結局連休前の平日12/13日に天気も上々とみて決行した。ルートは最後まで友人との調整が難航し、元々は2泊3日で所謂西穂・奥高縦走の提案をもらっていたのだが、ここは健脚で8時間程度、僕の脚力では多分10時間以上の行程になるし、ジャンダルムなどの難所もいくつかあるので、一般登山者は行くなと警告があちこちに書かれている熟練者限定ルートとなっている。パートナーはそんなに脅すほど大変じゃないから大丈夫だよと激励してくれたが、長丁場と危険度の両方を請け負うだけの自信が今の体調では持てなくて、弱気に西穂高岳の往復という縮小版プランに変えてもらった。

新宿発8時のスーパーあずさに乗って、Alpicoバスを上高地の帝国ホテル前で降りたのは12時半過ぎだった。田代橋まで歩くとそこから登山道が始まる。途中視界が開けるところは少なく、森の中をひたすら登り続ける3時間だ。この高度獲得は流石3000m級の山を目指すルートらしく、奥多摩あたりとはひと味規模が違う。一日目はこれで終わり、我々は西穂山荘に宿泊だ。山小屋の前にはテントが4張り、標高は2000m以上なので上着が必要な涼しさだ。


We had a plan of climbing Hodaka mountains after the high summer season, but the hot summer continued this year, and we finally executed the plan on 12th and 13th considering the good weather. The original idea, at least my partner’s recommendation, was 2-night/3-day walk through the ridge from Nishi-Hodaka to Oku-Hodaka, but it takes 8 hours for good walkers and would take me more than 10 hours. And besides, there are a few spots with risks such as Gens d’Armes that are highly cautioned against novice climbers in several guide books and web pages. My partner encouraged me saying those cautions were a bit excessive and it should be okay, but I thought my current condition would not be reliable enough to accept both of the long walk and the risky ups/downs. So we decided a 1-night/2-day walk to Mt. Nishi-Hodaka only.

We took 8 o’clock Super Azusa express from Shinjuku and got off the Alpico bus at Imperial Hotel of Kamikochi around 12:30. Through the promenade to Tashiro Bridge, the mountain road started and it was continued climbing of for 3 hours in the woods without much of open views. Nishiho-Sanso lodge is situated on the ridge exceeding 2000m altitude, and it was cool enough requiring warm cloth. 


田代橋から from Tashiro Bridge in Kamikoch


西穂山荘に到着 Arriving at Nishiho-Sanso


この山小屋での夕食の光景は凄まじい。何しろ平日なのにこんなに人が来ているのかと驚くくらいの混み具合で、しかも登山客の年齢層が高い。食堂は一度に100人くらい食事が出来る広さで、2部制に分けられて一度に皆呼び出されて、正味35分で食べ終えて後半の客に食堂を開けるという流れだった。勢い、用意する食事の内容も一気に準備できるようなもので、涸沢ヒュッテのような贅沢はない。
夕食後外に出てみると、見事な星空だ。頭上にオリオン座がとても近く見えた。山の中での贅沢なひとときだ。 

部屋は5x2の10人で雑魚寝状態。 消灯して2時間くらい寝たと思うが、 夜中ひと息のせいかどんどん温度が上がって、びっしょり汗をかいた。あとは目を閉じても眠れないまま、4時近くなると動き出す人がでてくる。我々も4時 20分に起き出して、出発の準備を始めた。近くの丸山に登れば日の出が拝めると聞いて、5時に山小屋を発つことにした。

I was amazed to see how busy the lodge was with so many weekday climbers, mostly rather aged, but the dinner scene was even more spectacular because everyone was called to gather in the dining room at once, actually separated in 2 sessions, and nearly 100 people had the meal in 35 minutes in order to clear the room for the next session. What we ate was something that the lodge could efficiently prepare for so many visitors at once, and it was no comparison to the luxury in Karasawa Hütte. Here in the mountain though, the real luxury was the incredibly beautiful stars in the sky outside the lodge.

The room contained 10 visitors which was filled with 10 futon beds with truly no extra margin. I think I slept for 2 hours after the light was turned off, but I sweated a lot as the room got hotter and hotter and I did not fall in sleep rest of the night. Some people started moving before 4, and we also woke up at 4:20. We planned to leave the lodge at 5 so that we could watch the sunrise on nearby Mt. Maruyama.  


明神岳から昇る太陽 Sunrise from behind Mt.Myojin

2日目の木曜日はほぼ晴れる日なのだが、朝は少し雲も出ているし、西の山からは霧がかなりの速度で流れてくる。 そんなわけで、高くには月が輝いていたが、 カラッとした朝焼けや雲海のようなフォトジェニックな風景にはならなかったが、東の地平で刻々と変わる空の色をしばらく眺めていた。


The second day should be a nice sunny day in overall but there were some clouds in the morning and the fog was running fast from the west. High up in the sky was the croissant moon but the sunrise in front of us was not quite photogenic. Still, we enjoyed watching the changing colors in the east.

眼下に梓川 Down below is Azusa River
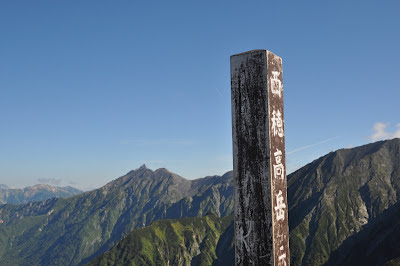
さて、丸山から先へ西穂高岳を目指して進むことになるが、一般登山者は途中の独標までで引き返しなさいと言われている。片道1時間半くらいではあるが、それでも靴だけは硬いソールのちゃんとした登山靴で行くべきで、服装は天候と季節に合わせればOKだろう。西穂高までの道は基本的に岩場のアップダウンを何度かこなさなくてはならない大変さというか、楽しさがあるが、注意さえすれば危険で足がすくむような怖さはない。独標を越えたら、次にピラミッドピークがあり、それらのピークから見渡すパノラマ展望は第一級のスケール感で圧倒される。丸山から3時間で西穂の山頂に辿り着いた我々はそこで朝食のおにぎりを食べて、あとはしばらく乗鞍、笠ヶ岳、槍、前穂と周りの景色に見入っていた。

Beyond Maruyama, we began the walk to Mt. Nishi-Hodaka. The guidebooks normally advise that Doppyo should be the destination and get back unless you are a good walker. It is only 90 minutes walk but at least the proper pair of climbing shoes with hard soles are suggested. The route to Nishi-Hodaka involves a few of small climbings and descents of steep rocks but I thought they were not too risky as long as you are always cautious. It took us 3 hours to the summit going through Doppyo and Pyramid Peak, and the panoramic views from these peaks were overwhelmingly the first class that included all the renowned mountains such as Norikura, Kasagatake, Yarigatake and Mae-Hodaka.

独標 Doppyo
ピラミッドピーク Pyramid Peak
西穂へのルート Route to Mt. Nishi-Hodaka
西穂から槍ヶ岳を臨む Mt.Yarigatake from Nishiho summit
奥穂縦走路 Ridge Line to Mt. Oku-Hodaka
笠ヶ岳 Mt.Kasagatake

いつものことだが、僕は下山になると脚のどこかが調子悪くなるのだが、 一応サポータをして臨んだ右膝はどうにか悲鳴を上げずに動いている。 しかし独標まで戻ったあたりでこれは筋力不足だなと感じる踏ん張りの利かなさから少し足元がおぼつかない状態になって、さらに靴の中で小指・薬指の先が痛くなりはじめた。ややヘロヘロ状態で山小屋に戻って、昼食と長めの休憩を取る。

本来、あとは前日来た道を降りて上高地に戻る計画だったが、あの長い登りの逆を行くのかと思うと、またまた確信が失せてしまい、パートナーにロープウェイで新穂高口に降りたいと申し出た。そちらは1時間くらいのルートでバックアップとしてみていたコースだ。パートナーの友人はちょっと呆れたと思うが、無理はしないことと同意せざるを得なかった。僕としてはヘタることはないと確信が持てるだけでなく、行ったことのないコースが確認できるメリットも実は大きかった。このルートも実際には思っていたほど平坦ではなく、勾配としては上高地からの道と似たり寄ったりだったが、それでも時間的に短いので途中で泣きが入ることもなくロープウェイ駅に着くことが出来た。

ロープウェイで降りてから松本に戻るには、平湯温泉でバスを乗り継がなくてはならないが、その都度待ち合わせ時間があってスイスイとは前に進まない。平湯温泉のバスターミナルには足湯があって、僕は疲れた足をしばらく暖めた。2階だか3階にはちゃんとした温泉風呂もあるようだった。このルートは昔は安房峠越えにものすごく時間がかかっていたが、今はバイパスが通ったおかげで中ノ湯まではとても近くなった。このロープウェイで西穂高近くにアクセスというのは内容の濃い登り降りを含むハイキングをしようという人達には、捨てがたいプランだと思う。

平湯温泉バスターミナル Hirayu Onsen Bus Terminal
It becomes my routine in climbing down to deal with my legs that go problematic. I carefully had a supporter on my right knee that seemed working patiently, but when we came back to Doppyo, I felt my footsteps less stable probably due to the tired muscles in the legs and some fingers ached, too. I needed a long rest back at the lodge after lunch, and I told to my partner that I would like to walk to the ropeway station to go down instead of descending the route we had climbed the day before because I was not confident that I could manage that long slope all the way. My partner was obviously not in favor, I believe, but the experts cannot insist harder in such cases. Well, in addition to the shorter distance, I thought experiencing a new route was an advantage.

From Shinhodaka ropeway station to Matsumoto, we had to take 2 buses transferring at Hirayu Onsen, and each time there was long time waiting, so it was not so efficient. There was a foot bath tub in Hirayu Onsen bus terminal and I could soak my exhausted feet for a while. There seemed to be a proper hotspring bath in the upper floor that you could try if you are interested.
The access to Nishi-Hodaka area via ropeway is a good option for hikers who wants some dense ups and downs, I think.